10 Tips & Tricks for Setting Up and Customizing Microsoft Surface RT
By Ronald SmithWhen you open the box, there are just a few things you need to do to get your Microsoft Surface RT up and running. First, choose your language, agree to the terms and conditions, give your device a name, connect to your home Wi-Fi, and adjust some privacy settings. Once you complete this simple setup process, you’ll be ready to start using your device.
Since Windows RT might be new to you, I thought you might appreciate some helpful tips and tricks to help you get started. If you’re curious about using swipes and gestures, make sure to check out our previous post on A Guide To Windows 8 Metro Start Page Navigation before diving into the steps for setting up and personalizing your Surface RT.
Contents
- 1 Navigating the New Windows 8 UI
- 2 Setting Up and Personalizing Your Surface RT
- 2.1 1. Updating Windows and Apps
- 2.2 2. Get Logged In Faster with a PIN
- 2.3 3. Supercharge Your Security with Picture Password
- 2.4 Step 4: Set Up Your Own Email Account
- 2.5 6. Customizing Your Modern UI Tiles
- 2.6 7. Giving Your UI Tiles Unique Names
- 2.7 Step 8: Show Off Your Photos
- 2.8 9. Get Faster at Switching Between Apps
- 2.9 Social Integration
Navigating the New Windows 8 UI
Have you heard? Windows just released the brand new Windows 8 operating system, and it comes with an exciting new interface that shows us how Microsoft is changing its focus. Read more
Setting Up and Personalizing Your Surface RT
Let me help you get started with your Surface RT. Here are a few things you should know:
1. Updating Windows and Apps
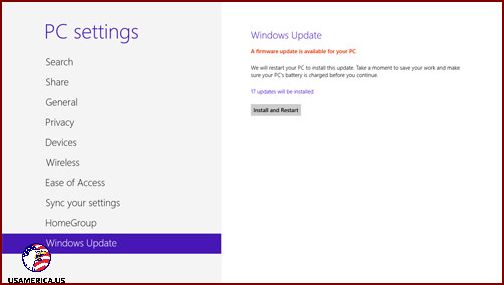
The very first thing you should do is update Windows and the pre-installed apps on your Surface RT. It’s important to keep everything up to date.
To update Windows, follow these steps:
- Open the Charms Menu by swiping from the right side of the screen (or you can move your mouse to the top-right or bottom-right corner of the screen).
- Click on Settings.
- Click on Change PC settings at the bottom of the Settings panel.
- Scroll to the bottom and you’ll find Windows Update. Click on it.
- Download and install any updates that are available. If prompted, restart your device.
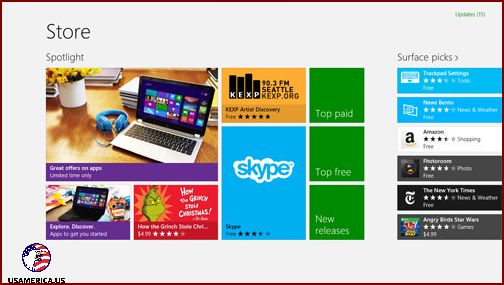
When you want to update the apps that are already installed on your device, there’s a simple process you can follow. Head to the Store app and look for the word “Update” in green at the top right corner. Just tap on it and your apps will start updating! It’s a quick and easy way to make sure you have the latest features and improvements for your favorite apps.
2. Get Logged In Faster with a PIN
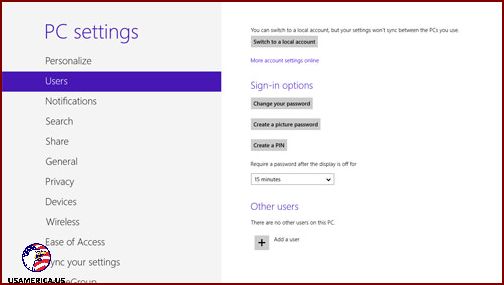
As a Surface RT user, you know that you need to enter your Microsoft account password whenever you want to unlock your device. This ensures that your personalized settings and preferences are synced to your Surface tablet. While entering your password every time can be a hassle, there is a simpler way to log in – by setting a 4-digit PIN.
To do this, just follow these steps:
- Open the Charms Menu.
- Tap on Settings.
- Select Change PC Settings.
- Click on Users.
- Choose Sign-in options.
- Finally, click on Create a PIN.
3. Supercharge Your Security with Picture Password
If you’re worried that your 4-number PIN isn’t strong enough to protect your device, I’ve got just the solution for you: Picture Password! It’s a cool new way to unlock your device that adds an extra layer of security. And the best part? It’s super easy to set up!
Here’s how you can create a Picture Password:
- First, head over to the same place where you usually create your PIN. Don’t worry if you’re not sure where to find it – I’ll guide you step by step.
- Start by opening the Charms Menu.
- Next, go to Settings.
- From there, click on Change PC Settings.
- Now, select Users.
- Finally, choose Sign-in options.
- In the Sign-in options menu, you’ll see an option to create a Picture Password. Click on it.
Once you’ve clicked on that option, your device will guide you through the entire process. It’ll even show you the different gestures you can use to create your unique Picture Password. It’s important to note that you must use your own picture for security reasons. So, pick a favorite photo or snap a new one, and let’s get started!
By using a Picture Password, you’re adding an extra layer of security that makes it even harder for anyone to access your device without your permission. Plus, it’s a fun and creative way to personalize your lock screen.
So, what are you waiting for? Give it a try and take your device’s security to the next level!

Step 4: Set Up Your Own Email Account
When you first start using the Mail app, it will display emails from the account you used to sign in. But what if that’s not the email you use most often? Don’t worry, you can easily add other accounts to the app, whether they’re from Hotmail, Outlook, Google, or even your own personal domain.
Here’s how to do it: first, open the Mail app, then go to the Charms Menu and select Settings. From there, click on Accounts. On the right side of the screen, you’ll see an option to Add an account.
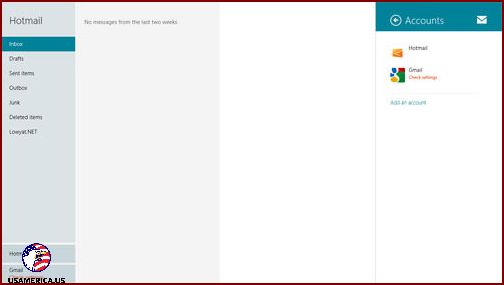
If you don’t want emails from your Microsoft account to show up on the live tiles, here’s what you can do: open the Charms Menu, then go to Settings and select Accounts. From there, choose the email account that you don’t want to see, and uncheck the box that says “Email” under Content to sync.
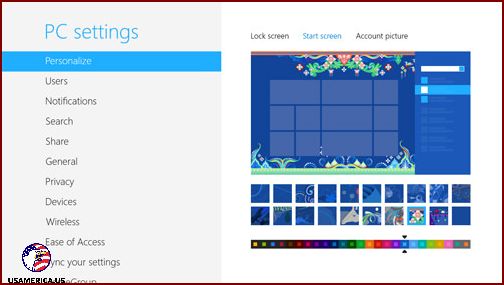
Another thing you can do is change the color scheme and background design of the Modern UI. If you don’t like the colors that are already set, you can easily pick a different color scheme. Just open the Charms Menu, go to Settings, then select Change PC settings. Finally, click on Personalize and choose the color scheme that you prefer.
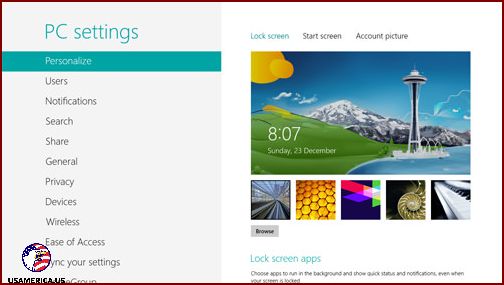
Hey there! Guess what? I have a super cool feature to share with you. You can change the lock screen picture right here, my friend. Isn’t that awesome? It’s like putting your personal touch on your device. You can choose any picture you want and make your lock screen truly yours. How cool is that? So go ahead and have fun selecting the perfect picture that reflects your style and personality. I can’t wait to see what you come up with!
6. Customizing Your Modern UI Tiles
When it comes to apps, we all have our favorites. So why not make your tiles reflect that? You can personalize your app tiles to show which ones are the most important to you. And it’s easy to rearrange them too – just tap and hold a tile, and then move it wherever you want.
You have the option to make your tiles bigger or smaller, depending on your preferences. But remember, smaller tiles will display less information. If you don’t want any information on your tiles at all, you can temporarily disable it. Just go to the Charms Menu, select Settings, then Tiles, and tap on Clear.
7. Giving Your UI Tiles Unique Names
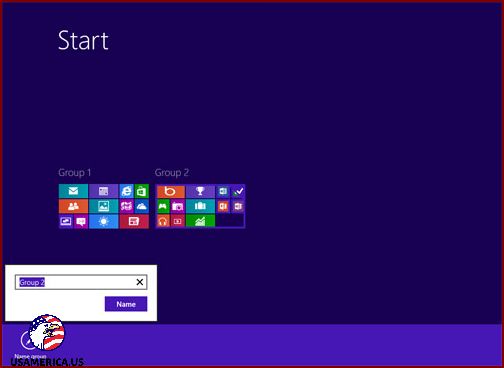
If you want to organize your tiles in a better way on the Modern UI, you can use a simple trick. Just pinch with two fingers to zoom out of the view and see all your tiles grouped together. Then, you can flick downwards on any group to bring up the menu at the bottom, or right-click with your mouse. From there, you can tap on “Name group” and give it a cool name. Click “Name” and do the same for any other groups you want to rename.
Step 8: Show Off Your Photos
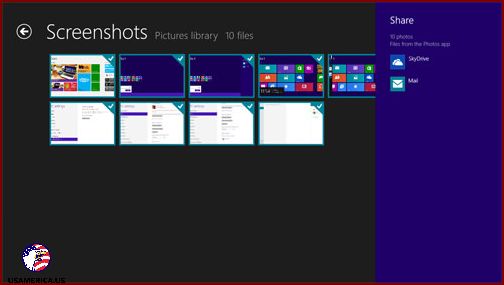
Would you like to show off your amazing photos to your friends and family? Lucky for you, sharing photos or screenshots is a breeze with the fantastic Photos app.
Here’s how you can share a photo or screenshot:
- Select the photo or screenshot that you want to share.
- Bring out the Charms Menu by swiping from the right side of the screen or moving your mouse to the bottom-right corner.
- Click on the Share option.
Now, you have a few different ways to share your photo:
- You can share it through Email. Just choose the email app you want to use, and it will automatically open with your photo attached to a new email.
- If you have a SkyDrive account, you can upload it there. This way, you can access your photos from any device with an internet connection.
- You can also share it through other apps that support in-built sharing. Just select the app you want to use, and it will take care of the rest.
So go ahead, share your favorite memories with the world!
9. Get Faster at Switching Between Apps
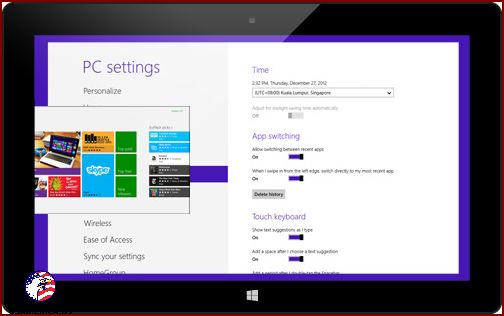
Did you know there’s a quick way to switch between your recently used apps? It’s as easy as swiping in from the left edge of your screen!
I’ll show you how to make it even faster. First, open the Charms Menu. You can find it by swiping in from the right edge of your screen or moving your mouse to the top or bottom right corner of your display. Once the Charms Menu appears, click on Settings.
Next, you’ll want to go to Change PC Settings. It’s located at the very bottom of the Charms Menu. Click on it, and a new menu will open.
Look for the General tab and click on it. Now, you’re getting closer to our goal.
Under the App switching section, you’ll see a few options. Make sure to turn on the second one. This will make the app-switching gesture even more efficient. You’re almost there!
Once you’ve enabled this option, all you need to do is swipe inwards from the left edge of your screen. This will show you the incredible multitasking bar with all your recently used apps. Neat, right?
But what if you want to see the multitasking bar even when you’re not using the app-switching gesture? Simple! Just swipe inwards from the left edge of your screen and then swipe back to the left. Voilà! The multitasking bar will appear, ready to serve you.
Social Integration
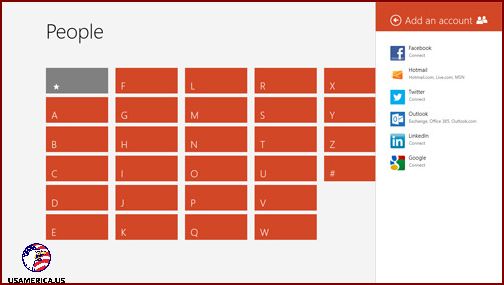
Hey there! The People app is super cool because it lets you stay up-to-date with all your social networks in one place. It’s like having a bunch of feeds at your fingertips! You can connect your Facebook, Twitter, and LinkedIn accounts to see what’s happening in your feed.
Want to add your Hotmail, Outlook, or Google account to the mix? No problem! Just head over to the ‘People’ app and follow these steps: Charms Menu > Settings > Accounts > Add an account. Sign in and all your contacts will be transferred over. Easy peasy!
I also have this cool messaging app that can do a lot of neat things. It’s called ‘Messaging’. With this app, I can connect not only to my friends who are on my Microsoft account, but I can also chat with my friends on Facebook. It’s really convenient because I can receive chat notifications and reply to them right away.
If you want to use this app, here’s how you can set it up. First, open the Messaging app and then click on the Charms Menu. From there, go to Settings and then click on Accounts. Next, click on Add an account and enter your Facebook details. That’s it! You’re all set up and ready to chat with your Facebook friends using the Messaging app.
Post navigation
Hello! I'm Ronald Smith, a dedicated finance consultant based in the USA and the author behind usamerica.us. My passion lies in empowering individuals and businesses to navigate the complex world of finance with confidence and ease. With a wealth of experience in financial planning, investment strategies, and economic insights, I've established usamerica.us as a premier destination for those seeking to enhance their financial literacy and achieve their economic goals. Whether you're aiming for personal wealth management, understanding market trends, or seeking strategic investment advice, my mission is to provide you with the tools, knowledge, and support needed to make informed financial decisions. Welcome to my world, where your financial success is my top priority!
