Master Google Slides with These 10 Amazing Tips!
Are you ready to become a Google Slides pro? Today, I’m going to share some awesome tips and tricks that will help you create stunning presentations like never before. Let’s dive right in!
1. Start with a Plan:
Before jumping into Google Slides, it’s important to have a clear plan in mind. Think about the message you want to convey and the overall structure of your presentation. This will help you stay focused and organized throughout the process.
2. Choose the Perfect Theme:
Google Slides offers a wide range of themes to choose from. Take your time to find the one that aligns with your content and reflects your personal style. A well-chosen theme can make your presentation visually appealing and engaging.
3. Keep It Simple, Yet Exciting:
Remember, less is more! Use simple and clear language to communicate your ideas effectively. Avoid overwhelming your audience with too much information on each slide. Instead, create visually captivating slides that complement your words.
4. Embrace Visuals:
A picture is worth a thousand words, right? Incorporate relevant images, charts, and graphs to enhance your message. Visuals not only add interest to your presentation but also help your audience understand complex concepts more easily.
5. Master the Art of Slide Transitions:
Smooth slide transitions can make your presentation feel polished and professional. Experiment with different transition effects, but don’t overdo it. Stay consistent and choose transitions that suit the overall tone of your presentation.
6. Utilize Speaker Notes:
Don’t let stage fright get the best of you! Take advantage of speaker notes in Google Slides. Use them to jot down key points, reminders, or even jokes to keep your presentation flowing smoothly.
7. Collaborate and Share:
Google Slides allows you to collaborate with others in real-time. Take advantage of this feature to work together with your team or gather feedback from others. Sharing your presentation is also a breeze. Just send a link, and you’re good to go!
8. Use Keyboard Shortcuts:
Become a speed demon by learning Google Slides keyboard shortcuts. These nifty tricks will save you time and make you look like a pro. Remember, practice makes perfect!
9. Add Interactivity:
Engage your audience by adding interactive elements to your slides. Embed videos, create clickable links, or even insert quizzes and polls. This will keep your audience actively involved throughout your presentation.
10. Practice, Practice, Practice:
Last but not least, practice makes perfect! Before delivering your presentation, take the time to rehearse. This will boost your confidence and ensure a smooth delivery. Remember, the more you practice, the better you’ll become!
That’s it, folks! With these 10 tips, you’re now well on your way to mastering Google Slides. So go ahead, create amazing presentations that captivate your audience and leave a lasting impression. Happy presenting!
")
Did you know that there are tons of presentation platforms available for businesses of all sizes? Pretty cool, right?
One of these platforms is Google Slides. It’s a super dynamic and cloud-based program that more and more businesses are starting to use. But here’s the thing: even though lots of people are giving Google Slides a shot, not many are taking advantage of all its awesome features.
Well, fear not! I’m here to help you step up your Google Slides game with these 10 awesome tips.
Contents
- 1 Get Ready to Level Up Your Google Slides Skills
- 1.1 1. Make Your Text Pop with Drop Shadow
- 1.2 2. Make Big Changes with Master Slides
- 1.3 3. Play with Images
- 1.4 Now, let me show you a few more nifty tips:
- 1.5 1. Bookmark Important Text
- 1.6 2. Let Your Words Flow
- 1.7 1. Get Set Up
- 1.8 2. Collaboration Made Easy
- 1.9 8. Put it on Your Website
- 1.10 9. Make a Folder for Everyone
- 1.11 10. Using Chromecast or AirPlay for Projecting
Get Ready to Level Up Your Google Slides Skills
1. Make Your Text Pop with Drop Shadow
At the end of the day, the devil is always hiding in the little details – and how things look really matters. One cool way to make important text stand out is by adding a drop shadow. Here’s how it works: you make a copy of the text and change its color or make an image a little see-through, and then you put it right on top of the original. This makes a subtle shadow that makes the text look even more awesome, especially the titles and headings.
2. Make Big Changes with Master Slides
If you’re really busy and don’t have a lot of time, you can edit a whole bunch of slides all at the same time using the master slides tool. This is also super handy if you want to change the whole look of your presentation to fit a specific theme or design. It saves you from having to change every single slide one by one, which can be a real pain.
3. Play with Images
So, I want to share a cool trick with you that Google Slides has up its sleeve. It has this amazing feature that lets you change the shape of an image you’ve added to your presentation. This comes in handy when you want to give your slides a unique touch and the standard rectangular photos just don’t fit your style.
Now, let me show you a few more nifty tips:
1. Bookmark Important Text
Have you ever had to scroll through endless slides just to find that one specific point you’re looking for? Man, it can be a real time-waster. Well, worry no more! Google Slides has a neat trick up its sleeve called bookmarking. With this feature, you can instantly zoom to any specific point or passages hidden within your presentation. No more aimless scrolling, my friend!
2. Let Your Words Flow
Tired of typing out text box after text box? I feel you! But don’t fret, my friend. Google Slides has got your back. By enabling the Voice Typing option, you can ditch the keyboard and simply speak out your thoughts. This awesome feature even recognizes punctuation commands, ensuring that each and every slide turns out exactly the way you want it to. Talk about a time-saver!
Just because I’ve upgraded to Google Slides doesn’t mean all of my co-workers will. It can be a real hassle working together on a business presentation if they’re using Power Point. But don’t worry, Google Slides has got us covered! I can open and edit Power Point files without having to convert them to Google files. Here’s how to do it:
1. Get Set Up
First things first, I need to open Google Slides using Chrome. Then, I’ll have to install the Office Editing for Docs, Sheets Slides Chrome extension. Once that’s done, I’m good to go!
2. Collaboration Made Easy
If me or a colleague have made some big changes to our presentation and we want to go back to a previous version, no problem! Google Slides keeps track of every change we make with its handy revision history feature. It even tells us who made each change! And the best part? I can instantly restore the presentation to a previous version with just a few clicks.
8. Put it on Your Website
If you think people who visit your website might be interested in your business presentation, you can easily add it to one of your website’s pages. The process is a bit different for each website, but if you use WordPress, you can find detailed instructions on how to add your Google Slides presentation here.
9. Make a Folder for Everyone
If different members of your team are creating Google Slides presentations for your company, you can upload images that everyone can use to Google Drive. Just make a new folder on Google Drive and share it with all the people you want to be able to use those images. That way, your whole team can quickly add your company logos and stock images to their presentations without needing to be connected to your intranet.
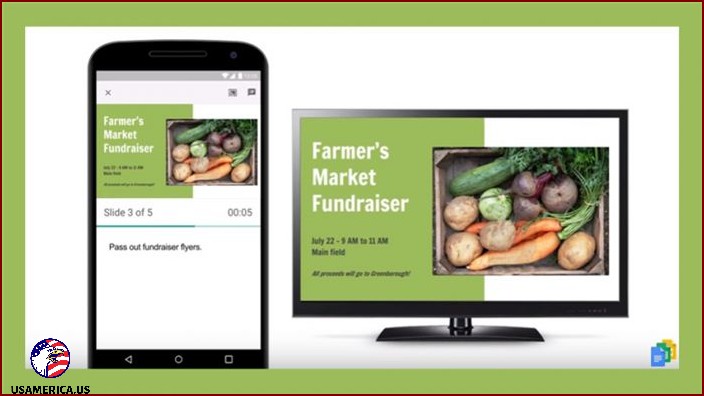
10. Using Chromecast or AirPlay for Projecting
When it’s time to show off my work, I can really make an impact and simplify things by going wireless. If I have my Google Drive on my iPad, for example, I can project it directly onto a TV that’s compatible. And if I’m using an Android device, I can easily project my Google Slides presentation using Chromecast.
Those are just a few helpful tips to get started. But Google Slides has so many cool features to explore! The best way to learn about them is by jumping right in and experimenting with the program yourself.