15 Tips & Tricks: Get the Best Out of Android 7 Nougat
Android 7.0, also known as Nougat, was first launched on August 22, 2016, for Nexus and Pixel devices. Since then, it has been gradually making its way to mobile devices worldwide.
Contents
- 1 20 Must-Have Rooted Android Phone Apps
- 2 Quick Settings can be customized to suit your needs. From the notification shade, simply swipe down with two fingers to access Quick Settings. From there, you can rearrange the tiles, add or remove shortcuts, and even change the brightness or toggle on/off various settings. It’s like having a control center right at your fingertips!
- 3 Get More Done, Faster
- 4 Make the Most of Multi-Window
- 5 Use Any App in Multi-Window
- 6 Responding and Seeing More: A Guide to Direct Replies and Expandable Notifications
- 7 Get All Your Notifications in One Place
- 8 Welcome to Better Notification Management
- 9 Make the Text and Screen Bigger or Smaller
- 10 Unlocking System Tuner UI
- 11 Save Your Data with Data Saver
- 12 Blocking Unwanted Calls and Messages
- 13 Shutting Down Background Services
- 14 Add Another Language
- 15 Get the Most Out of Your Battery
- 16 Secure Your Files with Encryption
20 Must-Have Rooted Android Phone Apps
Android devices use the terms “Root” or “SuperUser” to refer to elevated administrator privileges. Many users choose to root their Android devices, allowing them greater control over their device. To learn more about rooted Android phone apps, read on.
While you anxiously await the chance to try out the latest version of Android on your phone or tablet, I’ve compiled a list of helpful tips and tricks to help you make the most of the new features and improvements that Android Nougat has to offer.
Scroll down to explore each tip, or jump to a specific one:
- Customize Quick Settings
- Enhance Multitasking Speed
- Enjoy Multi-window Functionality
- Using multiple apps at the same time is a breeze with Multi-window. You can split your screen and have two apps running side by side. Want to watch a video while browsing the web? No problem! Just swipe in from the top right corner of the screen to access Multi-window, and then drag the app you want to use to the top half of the screen. Easy peasy!
- I love how I can now reply directly from the notification itself. No need to open the app! And if the notification is too long, I can simply expand it to see more details without leaving the notification shade. It’s so convenient!
- With bundled notifications, my phone is no longer cluttered by a ton of individual notifications. Instead, they are grouped together, so I can easily see what’s important at a glance. It saves me so much time and reduces the noise on my screen!
- Managing notifications has never been easier. Now, I can long-press on a notification to access the notification settings and customize how it appears. I can choose to block notifications from certain apps or set priority levels. It’s like having a personal assistant for my notifications!
- Sometimes, the default font and screen size just don’t feel right. Luckily, I can adjust them to my liking. Whether I want a larger font for easier reading or a smaller screen size for more content on the screen, I have the power to make it happen. It’s all about customization!
- Did you know there’s a secret System Tuner UI hidden in your device? Well, now you do! By long-pressing the gear icon in the Quick Settings menu, you can unlock access to additional system settings. From there, you can tweak and fine-tune your device to your heart’s content. It’s like having a backstage pass to your phone!
- We all want to save data, right? With Data Saver, you can do just that. When enabled, it restricts background data usage for certain apps, so you have more control over your data consumption. It’s a game-changer for those on limited data plans!
- Tired of unwanted calls and messages? Block them! Android gives you the power to block specific people and numbers, so you can enjoy a peaceful, uninterrupted experience. No more annoying telemarketers or spam texts!
- To keep my device running smoothly, I make sure to close any unnecessary background services. By swiping down from the top of the screen with two fingers and tapping the multitasking button, I can easily view and close any running apps or services. It’s like giving my device a breath of fresh air!
- I love being bilingual, and with Android, I can easily add my second language to my device. Not only does it change the system language, but it also enables multilingual typing and suggestions. It’s a seamless experience for those who love languages!
- Battery life is always a concern, but Android has some smart tricks up its sleeve to help optimize battery management. From the Battery settings, I can see which apps are consuming the most power and make adjustments accordingly. I can also enable battery saver mode to extend my device’s battery life when it’s running low. It’s like having a personal energy manager!
- Privacy is important, and Android understands that. With file encryption, I can protect my sensitive files and folders by encrypting them. This adds an extra layer of security, ensuring that only authorized users can access my private information. It’s like having a personalized vault for my files!
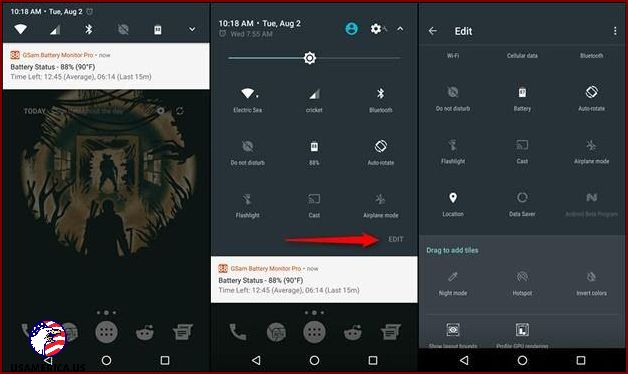
Quick Settings can be customized to suit your needs. From the notification shade, simply swipe down with two fingers to access Quick Settings. From there, you can rearrange the tiles, add or remove shortcuts, and even change the brightness or toggle on/off various settings. It’s like having a control center right at your fingertips!
Hey there! Have you ever wanted to quickly tweak your system settings without having to navigate through multiple menus? Well, I’m here to tell you about Quick Settings, a handy feature that lets you configure common settings in a flash.
With Quick Settings, you can easily activate rotation, turn on/off Bluetooth and Wi-Fi, and much more, all without even opening the Settings app! And the best part? You can customize which settings are available in Quick Settings, giving you even more control over your device.
Now, let me show you how to customize your Quick Settings. It’s super easy! Just follow these steps:
- First, slide down from the top of your screen to view the notification drawer. You’ll see a bunch of handy information and shortcuts up there.
- But wait, there’s more! Slide down again to reveal the settings toggles. This is where the magic happens.
- Next, look for the EDIT button. It should be somewhere around there. Click on it, and you’ll be taken to the Quick Settings tiles’ configuration.
- Finally, you can now drag and drop the tiles to set their availability. Arrange them however you like, and voila! Your Quick Settings are all set up.
And there you have it, my friend. With Quick Settings, you have the power to customize and easily access your most important settings. No more digging through menus or complicated setups. Give it a try and see how it simplifies your Android experience!

Get More Done, Faster
When I’m using my Android phone, multitasking is a breeze. Before, I used to tap on the square button to see all my open apps, organized by what I used most recently. But now, it’s even easier. All I have to do is double-tap the recents (square) button on the navigation bar and Android will instantly switch to the app I was just using.

Make the Most of Multi-Window
Did you know that you can now use two apps at the same time on your Android device? Thanks to a feature called Multi-Window, you can split your screen into two halves – either horizontally or vertically – and have two apps running side by side.
Here’s how you can take advantage of this amazing feature: First, open the app you want to use as your main focus. Then, simply press and hold the recents (square) button on your navigation bar. This will snap the app to the top half of your screen (if you’re holding your device vertically) or to the left half (if you’re holding it horizontally).
Now, you’re ready to choose another app to use alongside your main app. Just select one from your recently opened apps, and it will automatically snap to the other half of your screen.
Hey there! Did you know that you can use two apps at the same time on your device? It’s called multi-window! But wait, there’s a catch – the two apps you want to use together need to already be in your Recent Apps list. Keep in mind that not all apps support this feature just yet. However, don’t worry! I’ve got a workaround for you to try (next tip).

Use Any App in Multi-Window
Have you ever wished you could use any app in multi-window mode, but found that some apps don’t support it? Well, I’ve got a trick for you! There’s a developer option that lets you resize apps, allowing them to be used in split-screen mode. It’s not guaranteed to work for every app, but it’s definitely worth a try.
To enable this feature, you first need to enable developer options on your device. Don’t worry, it’s easy! Just go to Settings, then tap on About and Software information. From there, tap on the Build number 7 times. This will unlock the developer options for you.
Once you’ve enabled developer options, go back to Settings and find Developer options. Look for the option that says Force activities to be resizable and turn it on. This will make all your apps compatible with multi-window mode. Now you can use any app you want side by side with another app!

Responding and Seeing More: A Guide to Direct Replies and Expandable Notifications
Imagine this scenario: I’m playing my favorite game, the tension building up as I navigate each level. Suddenly, a message pops up on my screen. Normally, I would have to pause my game, exit out of it, and open the messaging app just to read and respond to the message. But not anymore! With the direct reply feature, I can respond to that message right from the notification drawer itself! No need to interrupt the flow of my game.
And that’s not all. The expandable notifications feature allows me to see more details of the notification without even opening the app. Let’s say I’m engrossed in watching a movie, and a notification appears. Instead of pausing the movie and launching the app, I can simply pull down the notification bar and read the entire notification right there. It’s like having a little window into the app, giving me the information I need without any extra steps.
These features are a game-changer when it comes to managing notifications. They make it quick and easy for me to stay connected and up-to-date, without sacrificing my current activity. So whether I’m in the middle of a thrilling game or lost in a captivating movie, I can respond and see more with just a swipe and a tap. It’s a seamless and convenient way to stay in the loop.
When a message arrives, I’ll show you how to use the direct reply feature on your device. Just slide down from the top of your screen to see the notification drawer. After that, swipe again on a specific notification with two fingers. This will allow you to type your reply message. Once you’re done, tap the reply button to send it.
Now let’s talk about expandable notifications. Whenever you receive a notification, look for a tiny arrow button on the right side. Click on it, or if you prefer, make the expand gesture by swiping with two fingers. This will expand the notification, showing you more details, like the complete message.
I hope that clarifies things for you!

Get All Your Notifications in One Place
Just like the notification stacks on Android Wear, bundled notifications bring all your notifications together into one convenient bundle. This means you don’t have to deal with each one separately.
If you tap once on a bundled notification, it will open the corresponding app. But if you want to see all the individual notifications within the bundle, simply swipe down with two fingers and the bundle will expand, revealing each notification separately.
From there, you can tap on any specific notification to view it within the app it came from, rather than just opening the app itself like before.

Welcome to Better Notification Management
With Nougat, you have the power to control certain types of notifications based on their source. Say goodbye to annoying ads, promotions, and other unimportant notifications like Facebook birthday reminders and game notifications. Keep only the important ones that truly need your attention.
To take advantage of this feature, simply press and hold on a notification from a specific app, and then choose how you want to handle it from the available options. You can either silence the notifications or completely block them.

If you tap on the “MORE SETTINGS” button (located at the bottom, next to “DONE”), you have the option to do a few different things:
– Block all notifications from this app
– Show notifications silently
– Control what appears on the lock screen
– Allow the app to ignore “Do Not Disturb” settings
Keep in mind that if you choose to show notifications silently, you won’t be able to override the “Do Not Disturb” settings. This is because overriding would require making sound, which goes against the purpose of silent notifications, of course.

Make the Text and Screen Bigger or Smaller
With Nougat, I can easily make the text and other elements on my screen bigger or smaller to suit my preferences. This means I can adjust the size of the app’s interface, including bars and buttons, to fit my display.
To change the size of the text throughout the user interface, all I have to do is follow these steps:
- Open the Settings app on my device.
- Select “Display” from the options.
- Tap on “Font Size”.
- Slide the slider to adjust the font size until it’s just right for me.
If I want to change the size of non-textual elements, like the drawer, bars, and buttons, I can do that too. Here’s how:
- Open the Settings app on my device.
- Click on “Display”.
- Tap on “Display Size”.
- Slide the slider to set the size I prefer.

Unlocking System Tuner UI
The System Tuner UI is a feature that gives you more control over your device’s settings and allows you to customize the design and experiment with new features. For example, you can enable power notification controls, which give you detailed control over each app’s notifications. You can also disable the quick settings panel to focus only on the notifications in the status bar.
To activate this powerful and potentially risky feature, follow these steps:
- Swipe down from the top of the screen to open the quick settings panel.
- Tap and hold the settings icon. It will start spinning.
You will see a confirmation message on the screen, indicating that the feature has been activated (see image below).

Save Your Data with Data Saver
Data Saver is a helpful feature that can help you reduce your data usage and save your precious battery life. When you enable Data Saver, it restricts access to data for apps running in the background. This means that apps won’t be able to use your data for tasks like syncing or loading ads without your permission. For example, if you haven’t explicitly opened an adware app, it won’t show any ads. However, it’s important to keep in mind that apps like Twitter won’t automatically refresh in the background unless you launch or interact with them.
To enable Data Saver on your Nougat device, follow these simple steps:
- Open the Settings app by tapping on its icon.
- Select “Data usage” from the available options.
- Tap on “Data saver”.
- Finally, switch on the Data Saver feature by toggling the button at the top right of the screen.
By following these steps, you can enjoy the benefits of Data Saver and take control of your data usage. Happy browsing!
If you’d like, go ahead and click on “Unrestricted data access” and select the apps that won’t be affected by the data saver. These apps will be able to use data without any restrictions and function at their best. This special list is helpful for important apps that you don’t want to miss any notifications from or have any delays.

Blocking Unwanted Calls and Messages
I’m excited to share that Android 7.0 Nougat has finally answered our prayers and introduced a much-anticipated feature – the ability to block numbers. Now you don’t have to deal with messages or calls from people you want nothing to do with. It’s especially handy when those annoying spam or advertising calls interrupt your work.
But that’s not all! This feature can also help you take control of marketing messages that flood your phone from stores. Blocking these numbers is simple. Just open the Dialer app, tap the Options button, go to Settings, select Call blocking, and click on the option to Add a Number. Then, all you need to do is enter the number you want to block, and voila! Problem solved.

Shutting Down Background Services
Usually, background activities gobble up precious resources. For instance, Facebook chews through your data and battery power to keep your timeline and other posts updated, while Twitter fetches the latest tweets from your feed or favorite list. But if your phone’s battery is teetering on the edge of depletion or you’re about to dive into a demanding game, it’s wise to terminate certain unnecessary services running in the background in order to free up resources and bolster performance.
To quit the services that are currently running, follow these steps:
1. First, go to “Settings” on your device.
2. Look for the option called “Developer options.” If you can’t find it, you will need to enable it. To do this, go to “Settings,” then “About,” and tap on “Software information.” Find the “Build number” and tap on it seven times. This will enable the “Developer options” on your device.
3. Once you have enabled the “Developer options” and can see them in the “Settings” menu, click on it.
4. Inside the “Developer options,” find the option called “Running services” and click on it.
5. You will see a list of all the running services on your device. To close each one, simply tap on it.
6. Once you have selected a service, a button labeled “STOP” will appear. Tap on it to stop the service and remove it from your device’s memory.
7. Repeat this process for each service you want to close.
By following these instructions, you will be able to close any running services on your device and free up memory for better performance.

Add Another Language
If you can speak two languages fluently, Android 7.0 Nougat has a cool feature that lets you use both languages on your device. This is really handy if you’re bilingual or if you travel a lot.
To use this feature, go to your device’s Settings menu, then tap on Languages & input. From there, select Language preferences. Tap on Add a language and choose your second language from the list. Once you’ve added it, you can easily switch between languages on your keyboard by tapping the globe icon or pressing and holding the spacebar key.

Get the Most Out of Your Battery
I have a bit of a gripe. As wonderful as our smartphones are, battery life always seems to be an issue. Let’s face it, battery technology hasn’t really caught up with all the other advancements. But fear not, there’s hope on the horizon. With Nougat, Android’s latest update, they’ve made some serious improvements to battery management.
One of the coolest features in Nougat is called “Doze on the Go.” It’s an upgraded version of the previous “Doze” feature, which was introduced in Android Marshmallow. Doze on the Go takes things to the next level by significantly improving your overall battery life. Sounds pretty great, right?
However, there is a slight catch. Some of your favorite third-party apps might not be compatible with Doze on the Go. That means they won’t be able to send you notifications or perform tasks in the background. So, there’s a small chance that you might miss out on some instant messages or other important notifications. But hey, at least your battery will last longer!
Good news! There’s a simple way to turn off battery optimization for certain apps. Just follow these steps: Go to your device settings, then select Battery. From there, choose Battery optimization and go to the All apps section. Now, you can individually select the apps you want to exempt from optimization. Just tap on each app and select Don’t optimize. Finally, click on DONE to save your changes. It’s as easy as that!

Secure Your Files with Encryption
In Android 7.0, there’s a new feature called File-Based Encryption. This exciting addition takes a different approach to security compared to the existing full disk encryption feature. Instead of encrypting the entire storage of your device, it now only locks specific parts. This means that your essential apps can still work properly even if you haven’t unlocked your device yet. For example, your device will still sound alarms and perform necessary actions even if it’s automatically restarted.
Hey there! Thanks to this nifty feature, you won’t have to bother with inputting the lock code every time you start up your device. However, if you want to switch from full disk encryption to file encryption, you’ll need to do a complete wipe. To encrypt your device using this cool new method, just follow these steps:
- First, go to Settings.
- If you haven’t already, enable Developer options. You can do this by going to Settings, then About, and tapping on Build number seven times. Easy, right?
- Once you have Developer options enabled, go back to Settings and scroll down to find it.
- Click on Developer options.
- Look for the Convert to file encryption option and select it.
- Finally, click on WIPE AND CONVERT to complete the process.
That’s it! Now you’re all set with your fancy new encryption scheme. No more lock code hassle, and your device is well protected. Enjoy!

So, that’s everything you need to know about the cool new stuff and improvements that come with the latest version of the most popular mobile operating system. What other things do you really like about Google’s Android 7.0 Nougat? Let us know in the comments. We can’t wait to hear from you!