10 Tips to Make Your Android Phone’s Battery Last Longer
There are some things you can do to make your Android phone’s battery last longer without sacrificing performance.
If you’re not happy with how long your phone’s battery lasts, it might not be your phone’s fault. There are a lot of factors that can affect battery life, including the size of the battery and the features and platform of the device.
When it comes to battery life, Android can be a bit draining. But don’t worry, there are features and options available to help you optimize your battery usage. Some of these options may not be well-known, so I’ll explain how to find and adjust them on your phone.
Ready? Let’s dive into the best tips and tricks for saving battery life on your Android phone.
Contents
Surviving a Low Battery on Android, Part I
Having a short battery life is one of the major drawbacks of Android phones, and there are moments when you find yourself running out of battery at the most inconvenient times. But don’t worry, I’ve got a solution for you.
Switch to the dark theme
It’s no secret that the screen of your device consumes the most energy, especially if the brightness level is cranked up. And to add to that, Android apps are designed with vibrant colors that gobble up even more power.
That’s where the dark theme comes in. By switching to the dark theme, you can save precious battery life on your phone, especially if your screen is AMOLED or OLED. In the dark theme, the background remains dark, and the black areas of the screen are actually powered off, conserving battery power.
So here’s the deal: Android Pie has this cool thing called a dark theme. It’s built-in and can save you some battery life. In fact, Google is encouraging app developers to create dark themes too! That means more standardization across apps. Now, let me show you how to enable the dark theme in Android Pie. It’s super easy, I promise. Just follow these steps:
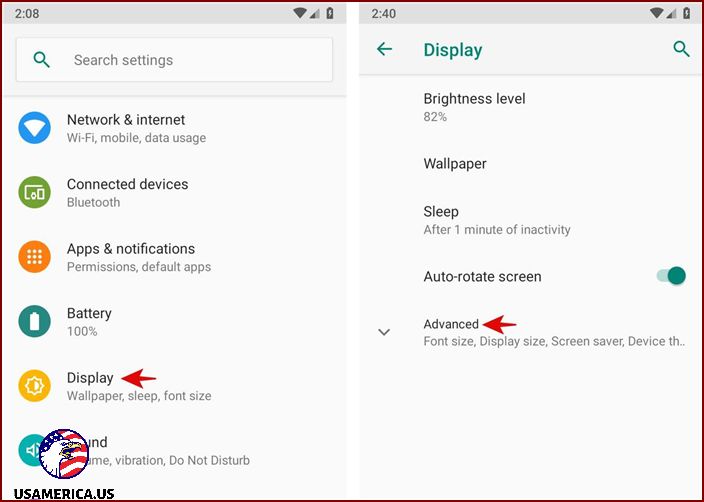
1. Open Settings, then select Display, and click on Advanced.

2. Next, click on Device theme and select Dark from the options.

Give it a try and enjoy the sleek, dark look on your Android device! Your eyes and battery will thank you.
Turn off ambient display to save battery
Have you noticed that your phone’s screen turns on when you pick it up? Well, that’s because of a fancy feature called “Ambient Display”. It’s meant to be helpful, but it actually drains your phone’s battery by turning on the display whenever it senses motion. And to make matters worse, it constantly shows notifications and the time, sucking up even more battery power.
Luckily, you can easily disable this feature to save battery and increase the standby time on your device. If you’re using an Android phone, just follow these simple steps:
1. Go to your Settings.
2. Look for the Ambient Display option.
Note: Keep in mind that different Android devices may have slightly different settings. If you can’t find the Ambient Display option using the steps above, you can always search for it in the Settings menu. And if all else fails, don’t hesitate to do a quick Google search for your specific device.
Make sure you have a strong signal
Did you know that having a weak signal can actually drain your phone’s battery? It may come as a surprise, but it’s true. When your phone is in an area with poor cellular coverage, it has to work harder to find a better signal, using up precious battery power in the process. Not only that, but it also increases the power to the nearest antenna in order to maintain a data connection, further draining your battery.
That’s why I’ve found it helpful to switch the network type depending on the signal strength. Even if it means sacrificing some speed and switching to a lower-speed data connection, it can be worth it to preserve your battery life. Another option is to use Airplane mode when you don’t need to be connected to a network at all. Here’s how you can change the network type on your phone:
- First, open your phone’s settings.
- Next, go to the system settings, and then select “About phone”.
- Scroll down and look for the option that says “Keep mobile data on during Wi-Fi connection” or something similar.
- Toggle this option to off. This will disable the always-on mobile data feature.
- First, open up Google Assistant on your phone.
To change your mobile network settings on Android, follow these steps:
1. Open the Settings menu by tapping on it.
2. Scroll down and select the Network & internet option.
3. Tap on Mobile network to access the mobile network settings.
4. A new window will appear. Look for the Preferred network type option and tap on it.
5. You will see several options: 4G, 3G, and 2G. Choose the one that suits you best.
6. Once you’ve made your selection, the settings will be applied automatically.
Now, let’s talk about turning off Automatic Wi-Fi on your Android device. This feature automatically connects your device to available Wi-Fi networks. While it can be convenient, it can also drain your battery and slow down your internet speed. To turn it off:
1. Open the Settings menu again.
2. Scroll down and find the Wi-Fi option.
3. Tap on it to access the Wi-Fi settings.
4. Look for an option called “Automatic Wi-Fi” or “Auto-connect to Wi-Fi.”
5. Toggle the switch to the off position to disable this feature.
By following these steps, you can easily customize your mobile network settings and disable Automatic Wi-Fi on your Android device. Enjoy your personalized network experience!
Hey there! Did you know that Android Oreo has this new feature? It’s pretty cool – your phone is always on the lookout for nearby networks with a strong signal, even if you’ve turned off the Wi-Fi. The idea behind this is to give you fast internet connectivity. However, there’s a catch: your device ends up using a lot of battery power to search for networks in the background.
Now, this auto-search feature is great when you don’t have to worry about your battery life, like when you’re at home or carrying a power bank. But when you want to save every last drop of juice, it’s not the best option. In those cases, you’ll want to disable this feature. Don’t worry, it’s easy to do, just follow these simple steps:
To modify your Wi-Fi settings on your Android device, follow these simple steps:
1. Go to the “Settings” menu by tapping on it. Then, select “Network & internet” and choose “Wi-Fi” from the options. This will bring you to the Wi-Fi settings page.
2. Once you’re on the Wi-Fi settings page, you’ll see a list of available networks. Look for the options called “Turn on Wi-Fi automatically” and “Open network notification.” Simply uncheck these two options by tapping on them. This will disable the automatic Wi-Fi connection feature and prevent any notifications about open networks.
That’s it! By following these simple steps, you can easily change your Wi-Fi preferences on your Android device. Now you can have more control over when and how your device connects to Wi-Fi networks.
Remember, it’s a good idea to prioritize Wi-Fi over your mobile data (3G or 4G) whenever possible. This will help you save on data usage and potentially improve your internet speed.
Your smartphone is built to connect to the fastest network available, which is usually 4G. However, if your phone’s carrier doesn’t support Voice over LTE (VoLTE), it will use 3G for calls and 4G for data. This can drain your phone’s battery because it has to connect to two networks at the same time.
What can you do to solve this problem? If your carrier doesn’t support VoLTE, you can use 3G for both calls and data. If you find that the speed is not satisfactory, you can switch to Wi-Fi. Wi-Fi uses less battery power because connecting to a nearby network requires less effort from your phone.
To conserve even more battery power, you can turn off the option for always-active data. This will prevent your phone from constantly checking for data updates in the background, saving more energy.
Your Android phone might be set to always have mobile data active, even when connected to Wi-Fi. This helps prevent any interruptions when switching between mobile data and Wi-Fi connections. However, having both connections active can drain your phone’s battery faster, reducing its standby time.
To conserve battery life, it’s a good idea to disable this setting. Here’s how:
By turning off this setting, you can help extend your phone’s battery life and increase its standby time. So go ahead and give it a try!
Now let’s go over the steps to enable developer options on your Android phone. First, click on “Advanced” and then tap on “Build number” multiple times until you receive a notification that the developer mode has been enabled. It’s important to note that you’ll need to do this to access certain features and settings on your phone. Once you’ve completed this step, head back to “System” and then click on “Developer options.”
Next, let’s look at how to turn off mobile data always active. Under the “Networking” category, you’ll find the option to disable “Mobile data always active.” This can help save your data usage and extend the battery life of your phone.
Lastly, if you want to disable the Google Assistant, simply follow these steps.
By following these instructions, you’ll be able to customize your Android phone to better suit your needs and preferences. And don’t worry, if you ever want to re-enable any of these features, you can always come back to the settings and make the necessary changes.
Hey there! Did you know that Google Assistant can help you accomplish tasks using just your voice? It’s pretty neat! All you have to do is say “Hey Google” to wake it up, and then you can ask it anything you want, like “What’s the weather like today?” Once it hears your command, it gets to work and does what you asked. For example, if you want to know the weather, it will find that information and give you the details.
But here’s the really cool part: Google Assistant can even work when your smartphone is in standby mode. That means you don’t have to have your phone unlocked or actively using it. Pretty convenient, right? The only catch is that it needs to always listen for the wake command, which can use up more of your phone’s battery. So, if you don’t really need this feature and would rather save your battery life, you can turn it off by following these steps:
To make sure your Google Assistant respects your privacy, follow these simple steps:
1. First, tap on “More > Settings” and then click on “Assistant.” You should see a screen that looks like this:

2. Scroll down to “Assistant devices” and choose your phone or tablet. Then, turn off the options for “Access with Voice Match” and “Unlock with Voice Match.” Here’s what it looks like:

That’s it! By configuring these settings, you can ensure that your Google Assistant respects your privacy.
You can set up your phone so that it can have a peaceful sleep without any disturbances. By automatically turning off optional features like mobile data, network, location, and sync services, you will not be bothered by calls or notifications in the middle of the night. Plus, this also helps save your phone’s battery.
Some phones have features like Auto-Sleep, Battery-Saver, and Do Not Disturb, which you can activate to turn off these settings at night. If your phone doesn’t have these features, you can use IFTTT. With IFTTT, you can create a recipe to save your phone’s battery during the night. Here is a list of recipes that are available for free:
– Turn off Wi-Fi at Night
– Mute your Android phone at bedtime
Additionally, you can switch to lite versions of your apps. These lite versions consume less data and battery power, providing a smoother experience and helping your phone last longer.
Did you know that there are lite versions of popular apps? These lite versions were originally designed for low-resource devices, but they can also help you save your phone’s battery. They are simpler and have only the essential features you need. For instance, you can find lite apps for Amazon Kindle, Facebook, Facebook Messenger, Shazam, Twitter, and more.
The lite versions of these apps require fewer resources compared to their regular counterparts. They take up less memory, storage, and have slower web connectivity. Let’s take Facebook as an example. The regular Facebook app uses up around 150MB to 300MB of RAM in the background. However, the lite version only takes up 50MB to 150MB. Because the lite versions are less demanding on your phone’s resources, they also help save battery life.
What about greenifying the apps you use the least?
When you’re using your phone, all kinds of activities are happening in the background that wear down your battery. But don’t worry! Android Marshmallow has a solution called doze, which puts your phone into a low-power sleep mode when it’s not in use. And if you want to take it a step further, there’s a cool app called Greenify that has an even more aggressive doze mode to save even more battery power.
Doze mode kicks in after your phone has been idle for a while, but aggressive doze mode starts working within minutes of your phone being left alone. That’s why it’s better to use aggressive doze mode instead of the built-in doze feature. Here’s how you can do it:

To save precious battery life on your phone, follow these steps:
1. Download and open the Greenify app from the Play Store.
2. Tap the options button and select “Settings.”
3. Enable the “Aggressive Doze (experimental)” option.
I found these tips when my phone died at a critical moment. While the usual battery-saving options are effective, sometimes you need to take extreme measures. That’s why I suggest trying these tricks to squeeze every drop of battery juice during desperate times.