10 Android Notification Features You Can Tweak
A while back, I shared some pretty awesome things you can do with your Android device. We talked about apps that make switching between apps a breeze, creating your own unique Android homescreens, tools for connecting your device to a computer, Xposed modules for avoiding the hassle of flashing, and even how to rid yourself of ads in apps and browsers on Android.
But today, I want to dive into something specific – the incredible features that can be found in Android notifications. Specifically, I’m going to show you all the ways you can customize and personalize your notification bar and Quick Settings Panel.
There’s so much you can do, like managing all your notifications at once, adding your own profile picture to the notification bar, and even interacting with your apps right from the bar itself. Trust me, it’s mind-blowing. So, let’s dig in, shall we? Here are 10 amazing features you can find in your Android notification bar. And if we miss anything, just give us a holler in the comments below.
Contents
- 1 Discover 10 Secret Features in Developer Options on Android
- 1.1 1. Show a 24-Hour Clock in Your Notification Bar
- 1.2 2. How to Add Your Profile Picture to the Notification Bar
- 1.3 3. Hiding WiFi Notifications
- 1.4 4. Taming the Quick Settings Panel
- 1.5 5. Customize Your Notification Sound
- 1.6 6. Expand and Collape Notifications
- 1.7 7. Get Rid of All Notifications
- 1.8 8. How to Find Your Dismissed Notifications
- 1.9 9. Interacting with Notifications
- 1.10 10. Turn Off Update Notifications
Discover 10 Secret Features in Developer Options on Android
Have you ever stumbled upon the hidden “developer options” on your Android device? It’s like finding a hidden treasure trove. Let’s dive in and explore these hidden gems.
1. Show a 24-Hour Clock in Your Notification Bar
Do you prefer the clarity of a 24-hour clock? You can easily switch your clock to display the time in this format. Say goodbye to “5 pm” and hello to “1700 hours.”

- First, go to Settings and then Date & time.
- Next, check the box that says Use 24-Hour format.
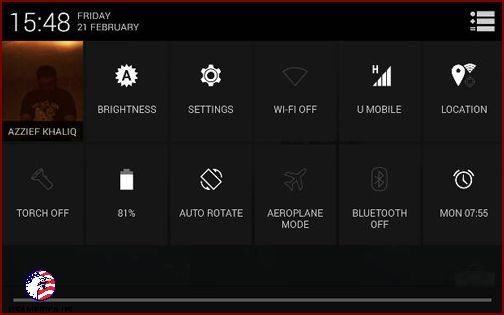
2. How to Add Your Profile Picture to the Notification Bar
Did you know you can personalize the quick settings panel with your own profile picture? It’s easy! Just follow these steps:
Make sure you have your Google+ account linked to your Android phone, and that you’ve already uploaded a profile picture there.
3. Hiding WiFi Notifications
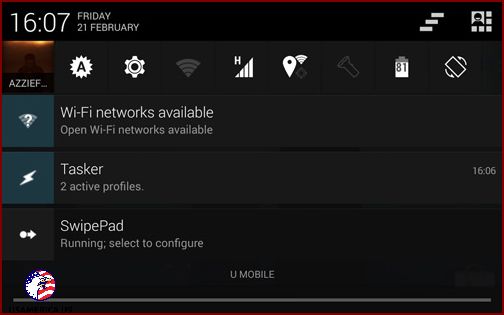
When you have your Wi-Fi turned on, but there are no available Wi-Fi networks, you keep getting notifications about available networks. Here’s how to get rid of them:
- First, go to Settings and then WiFi.
- Next, either press the menu button on your device or look for the options menu (…) and tap on it.
- Then, tap on Advanced.
- Finally, uncheck the box next to Network Notification.
Note: If your Android device doesn’t show this option, you can try another method, but it requires rooted access.
4. Taming the Quick Settings Panel
Hey there! Have you noticed the two different notification bars on Android? Yeah, there’s the one with all your regular notifications, and then there’s the Quick Settings Panel, which is like a shortcut to your settings. Pretty cool, right? Well, I’m here to help you master this handy feature. Here’s what you need to do:
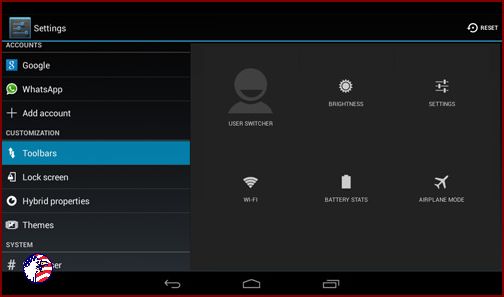
- To change your toolbar settings, go to Settings > Toolbars.
- In the toolbar section, you’ll find Quick Settings Panels > Tiles and Layout.
- If you want to add more tiles, simply tap on “Add”. To remove a tile, hold down the current tile and drag it to the “Add” button.
5. Customize Your Notification Sound
If you’re not a fan of the default notification sound, don’t worry! You can easily change it in the settings app. Just follow these simple steps:
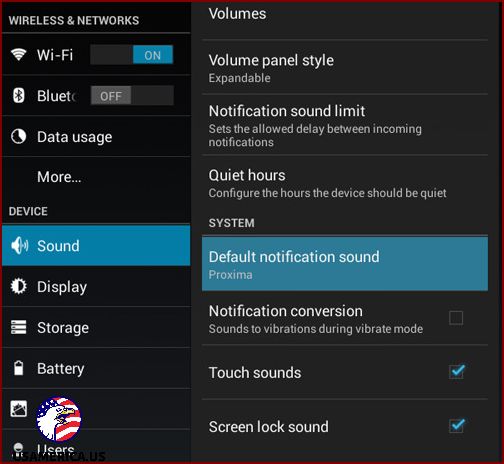
- To change your notification sound, go to Settings > Sound.
- Select Default notification sound.
- Choose your favorite sound from the list.
6. Expand and Collape Notifications
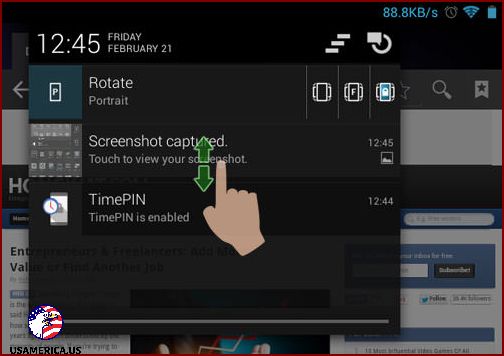
Starting from Jelly Bean 4.1.2, you have the option to expand and collapse app notifications. This allows you to see more details about the notifications or interact with them without opening the app.
To expand a notification, simply swipe down on it, and to collapse it, swipe up.
7. Get Rid of All Notifications
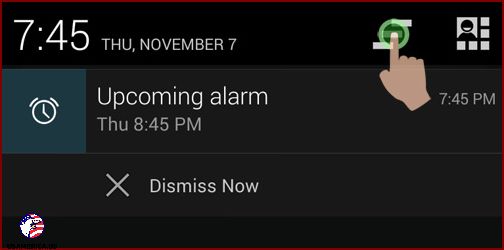
If you ever find your Android notification bar filled up with notifications that you no longer want to see, there’s a nifty little button that can help you out. It’s called the “Dismiss All Notifications” button, and you can find it at the top right corner of your Android notification bar. When you tap on it, like magic, all of your notifications will disappear in an instant.
Just keep in mind, though, that certain notifications may come back after a while. These are usually the ones that require you to open them, such as emails, hangouts, or WhatsApp messages. But at least you can enjoy a blissful moment of notification-free peace.
8. How to Find Your Dismissed Notifications
Hey there! If you’re using Android Kit Kat and you’ve accidentally dismissed some important notifications, don’t worry! I’ve got your back. Here’s what you need to do:
First, go to your home screen by pressing the home button or swiping up from the bottom of your screen.
Next, swipe down from the top of your screen to open the notification panel. This is where you’ll find all your recent notifications.
However, if you’ve already dismissed some notifications and they’re no longer visible, don’t panic! There’s still a way to find them.
What you’ll need to do is swipe down again on the notification panel. This will reveal the “History” option. Tap on it.
Now, you’ll see a list of all your dismissed notifications, neatly organized by date and time. Simply scroll through the list to find the notification you’re looking for. It’s that easy!
Remember, if you want to dismiss a notification without accidentally losing it, just swipe it slightly to the right or left. This will hide the notification without dismissing it completely.
And there you have it! You can now find your dismissed notifications with ease. No more missing out on important updates or messages.
I hope this helps! If you have any further questions, feel free to ask. I’m here to assist you.
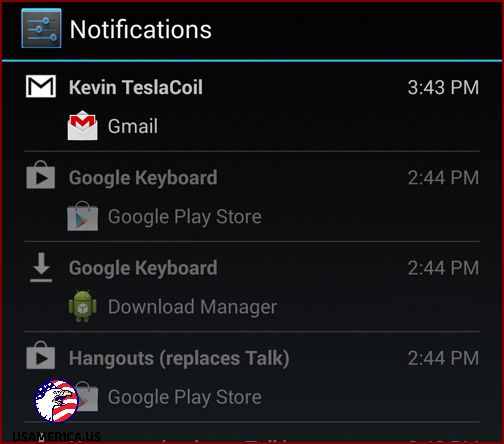
- Press and hold the home screen and tap on Widgets.
- Select Shortcuts, then choose Notifications.
9. Interacting with Notifications
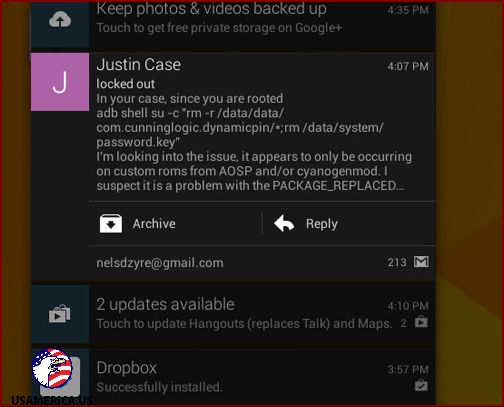
If you have Android Jelly Bean 4.1.2, you can interact with your apps right from the notification bar. For instance, when you receive an email notification in Gmail, you can expand it, tap on the reply button, or even choose to archive that email directly from the notification bar. It’s worth mentioning that this feature is only available for a small number of apps.
10. Turn Off Update Notifications
I don’t know about you, but I find those constant notifications about updates quite annoying. Good news is, you can stop them from bothering you. Here’s how:
- First, go to Settings and find the Play Store option.
- Next, tap on the menu button in the Play Store to access the settings.
- Now, uncheck the box that says Notifications.
Just remember, this won’t stop apps from updating automatically. If you want to learn how to do that, take a look at this post on Android tips and tricks.
